Friday, March 31, 2017

Wood Hello Spring Flowers.

I found this pack of adhesive backed wood veneer at Target on clearance, and I wondered if I could die cut it. Well it turns out it cuts beautifully!
I stamped the two main flowers with the Simon Says Stamp Spring Flowers set and heat embossed them with silver embossing powder, then I stamped the other flowers and leaves in versamark ink, I really like the watermark on dark grey paper. 
For the hello die cut I sort of lightly tapped it with the versa mark pad toward the middle and applied more pressure toward the bottom. When I applied the embossing powder I also brushed some away towards the middle leaving heavy cover toward the bottom of the word. This give it a dipped in silver look. 
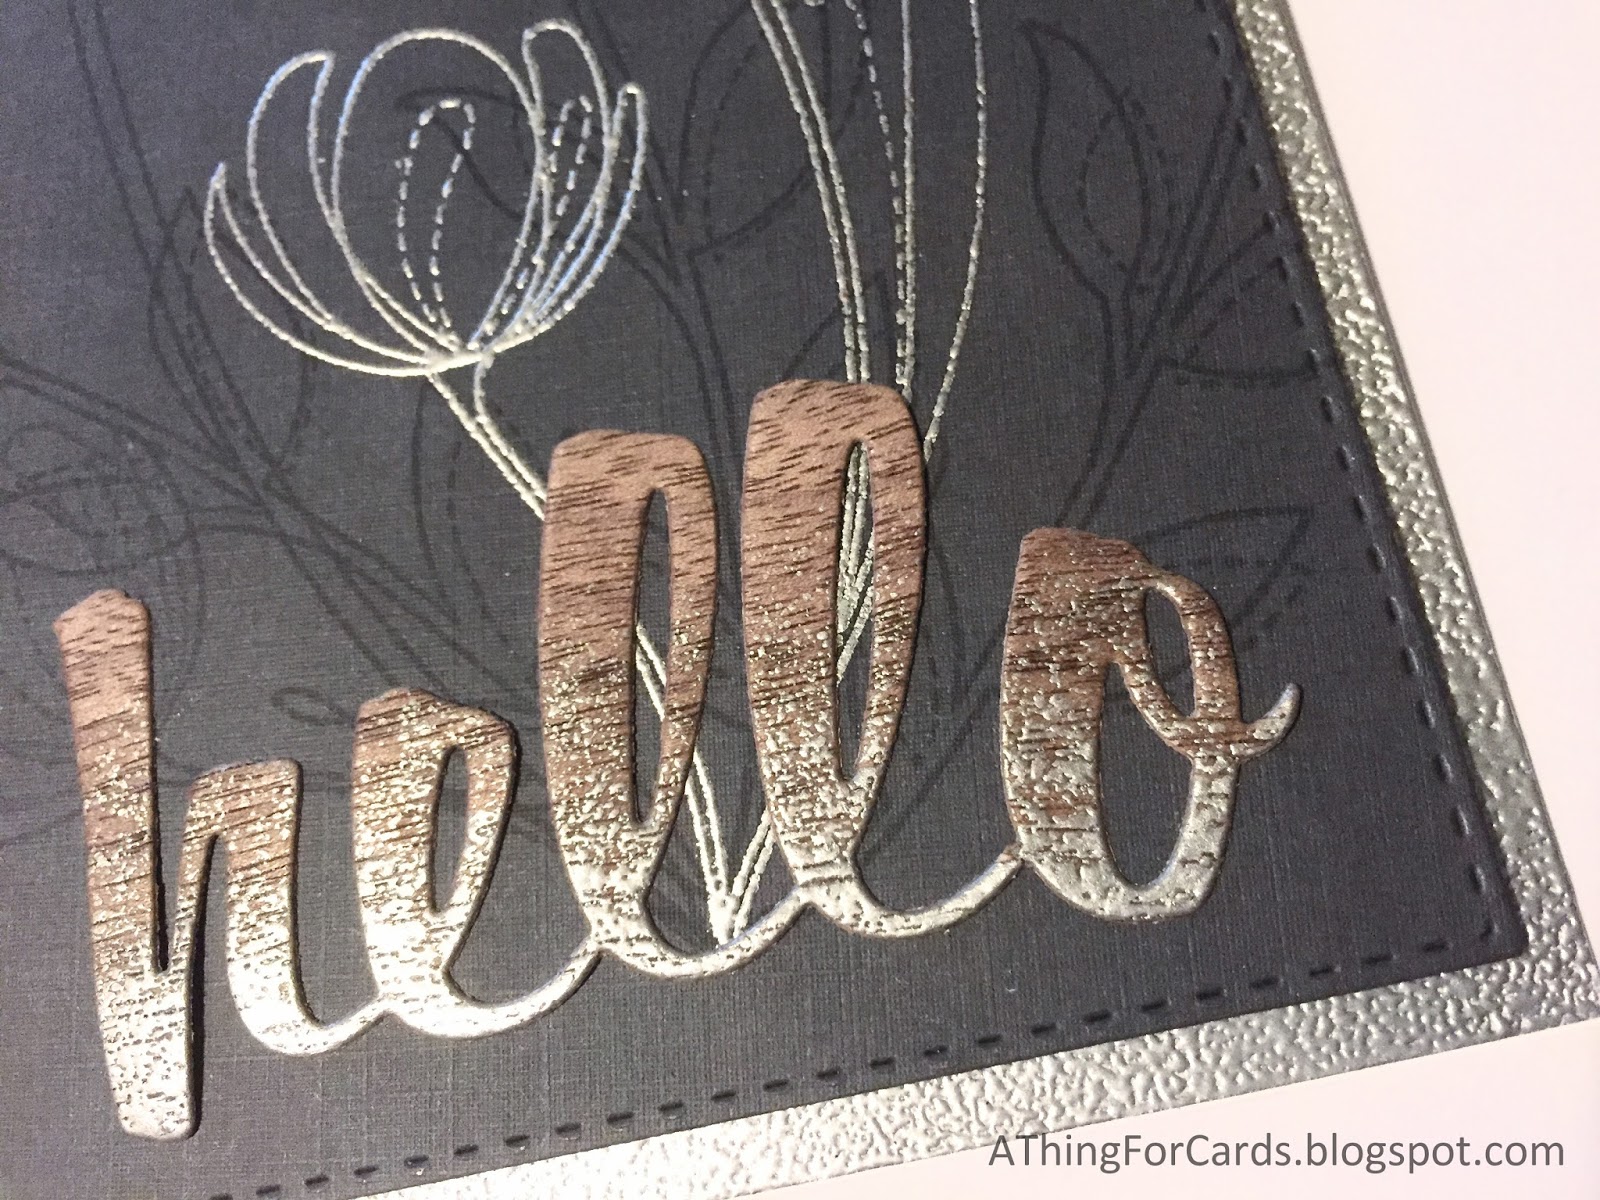
I originally put it on a black background but that wasn't quite right, so kind of pounced the embossing powder around the edge of a white panel and sprinkled the embossing powder around the edges. The lighter coating created this bumpy almost hammered look.
I am extremely happy with the way this card turned out. I appreciate you stopping by to take a look! 


CASology Week 242: TEXT

This will be my very first CASology project. The cue card for this week is TEXT.
 I was really inspired by Hannelie's card in the inspiration images. I loved the bright yellow and really wanted to find a way to use it.
I used the Spring Flowers stamp set from Simon Says Stamp. I stamped it in gray ink and then added some dimension to the flowers and leaves with my Copic markers. 
I die cut the Hello in yellow and black, stacked them and adhered them on top of the floral images. The yellow paper has the slightest bit of texture but it really does not show up in the photos.
Thank you for stopping by! 


I will also be adding this card to the Simon Says Stamp Work It Wednesday for March 2017.


Oh Happy Day! Cling Wrap Smooshing.

For this weeks challenge Simon Says Stamp said Any Thing Goes!  I decided to pay with my new Distress Oxide inks again, this time I tried the cling wrap technique.
I smooshed several colors on cling wrap, spritzed it a bit to get it wet then pressed it down on some water color card stock and mushed it around. I let it dry over night, which was hard because I really wanted to mess with it. But I did not, and I was glad the effect is really striking.
I cut a strip from the panel I made, die cut the words and some hearts from the remainder. I used the Oh Happy Day and the Holiday Shapes Hearts & Stars dies from Simon Says Stamp. I added a strip of glitter card stock then stacked a piece of Neenah white to adhere the die cuts to. I stuck them down with a glue pen and I was done!
Thanks for stopping by to look! 


Tuesday, March 28, 2017

MFT Doodle Blooms Emboss Resist

I really love the flowers from the new MFT Doodle Blooms kit that came in last week and I also recently got the new Distress Oxide inks so I though I needed to create a card using both.
First I created an ink blended background on Bristol smooth card stock using Worn Lipstick, Cracked Pistachio,  Broken China and Wilted Violet.
Then I stamped the blooms from the kit on the background in Versamark and heat embossed them with clear embossing powder. 
After they were all embossed I used the sponge blenders and Distress ink in Black Soot and Hickory Smoke, concentrating the black toward the outer edge and the grey toward the center.  I have seen this called emboss resist and Joseph's Coat, I was worried the thinner lines in this set would not work but I was pretty pleased with the effect. 
I then heat embossed the sentiment on a piece of torn vellum folded it under both sides and stuck it down. I also added a few sequins, for some reason they look kinda yellow in photos but in reality reflect pinks, blues and purples. 

Thanks for taking a look! 


Monday, March 27, 2017

Simon Says Stamp April 2017 Kit, Penguin!

I adore penguins, I have for as long as I can remember. When the first sneak peek was posted for this kit and I saw the penguin I started counting down the days. I got my kit in the mail today just in time for the Simon Says Stamp Monday Challenge, Things with Wings. I certainly think this little guy fits the bill.
For the first card I masked the penguin and blended the Simon Stamp inks included with the kit around the mask, I used the Orange Slush, Lemon Zest and Key Lime. I then masked his little flipper so I could have him holding a heart.
I colored the images and sentiment with Copic markers. I used the green Lawn Fawn plaid paper that came with the kit, cut with the largest of the Simon Says Stamp Stitched Rectangle dies, to frame the stamped panel, and adhered it to a card base.
The second card was super simple single layer card, I stamped the penguin masked him off to stamp the heart images behind him and again I had to mask his flipper so he could hold a heart. 
I did some simple coloring with Copic markers. I added a few details with a white gel pen and it was finished! I am wild about this penguin! 
This is the first Simon Says Stamp card kit I have gotten and I have to say I am pleased. This is also my first time using Simon inks, I love them and will surely be getting more, they blended really nicely and the colors are nice and vibrant. 
Thank you for coming by to take a look!


Sunday, March 26, 2017

MFT Color Challenge 66

For My Favorite Things color challenge #66 we were given the task of making a card with Four colors, Safety Orange, Cranberry Cocktail, Tropical Teal and Tangy Orange.
I had some trouble getting started and finally found inspiration with the arrow patterned paper which is found in the MFT Free Spirit 6" x 6" paper pack. I used the MFT Stepped Up Chevron dies for the horizontal element. I blended ink on a piece of Neena Solar White card stock with mustard seed and orange to try and match the Safety Orange, then covered it in clear embossing powder and adhered bit of teal card stock peak out from the peaks and valleys. 

 I cut the word hugs from a piece of Neenah that I inked up with orange and heat embossed with clear powder. I used the MFT Sweet Succulents stamp and die-namics for the cacuts and pot, I colored them with copic markers, glitz-ed them up with Wink of Stella and attached them with foam dots. 
Thanks for stopping by to take a look!


Saturday, March 25, 2017

Doodled Blooms MFT Sketch Challenge #325

For the My Favorite Things Sketch Challenge #325 I decided to use the square floral image from the new Doodle Blooms kit. I used the sentiment from the MFT Rainbow of Happiness stamp set and the word "Color" from the Color the Rainbow die-namics.
I stamped the flower several times on white card stock to create a pattern and colored it in various shades of gray then added white accents with my gel pen. I decided the images were a bit too dark so I cut a piece of vellum to lay over the image to tone it down a bit.
 I cut a frame of black card stock to hide the glue I used to adhere the vellum and glued it on top. Then I stamped the flower and leaves again, colored them with bright colors, added some white gel pen accents and cut them out using the matching dies. I then added the flower and leaves on top of the frame.
The sentiment was heat embossed in white on black card stock and then I cut it out with one of the banners from this months free die set, Rectangle Window Word Frames. The word die from the Color the Rainbow die-namics set fit perfectly on the strip. 
Thank you for taking a look!


Wednesday, March 22, 2017

Distress Ink Multi-Level Die Inlay!

For the Simon Says Stamp Wednesday challenge we were asked to use more than one die or punch. I used two, the Simon Says Stamp Chevron Background die (I don't think they sell it anymore) and the Lil' Inker Hello die.

I used Distress ink and smooshing to create the main panel on Distress water color paper. I then used the chevron background die to cut the water color panel and some teal card stock.
I put the the teal card stock panel on my card base and then attached the water color panel on top. I then adhered the negative pieces in their places without the teal card stock under them so they are recessed from the rest of the image. If you try this with a die with a lot of similar shapes be sure to do a better job than I did keeping them straight. I spent way too much time trying to get them back where they went!
I cut the "hello" from the same teal card stock, added a bit of shimmer with my Wink of Stella pen and then adhered it on top. 
Thanks for taking a look!


Lawn Fawn Year SEVEN double window shaker!


I instantly fell in love with the Year SEVEN stamp set. When Lawn Fawn started the Lawn Fawnatics challenge with a birthday theme to celebrate their 7th birthday, this card just had to happen.
I stamped the images and colored them with Copic markers, then I stamped the pinata again with the MFT mirror stamp so I could adhere them back to back. This way when the card is open you can see the other side of the pinata. The shaker bits are created with the candy stamps I cut them with the coordinating dies and luckily they are symmetrical and two pieces could be easily adhered back to back!
(I did not take a picture of the mirror image side before I put the card together but below you can see two different options of coloring I considered)
I cut a window in the card base and used foam tape to add dimension before adding the frame I suspended the two pinata images sandwiched with the green embroidery floss. I then added my shaker bits and closed it up. The plaid papers in the Lawn Fawn Perfectly Plaid Rainbow 6" x 6" pack were perfect for the finishing touch. 
I had to use the rest of that plaid paper so I used it for the inside frame too.  I finished the inside with the sentiment from the set and a few candy pieces colored to match.
Thanks for stopping by!


Ink Blending in Space!

This Birdie Brown Space Explorer stamp and die set from My Favorite Things might be my new go-to birthday set. I created the background with Distress Ink blending, spritzed it with water and added the "stars" with white paint splatters.
The images were colored with Copic markers, I added a bit of white gel pen for highlights on the space suit and some Wink of Stella glitter on the planets for some sparkle.  I popped all the images up on foam tape for dimension.
I used regular white sewing thread to make the planets look like birthday balloons and then white heat embossed the sentiment.
Thanks for stopping by! 


Tuesday, March 21, 2017

Succulents and Smooshing!

 I used My Favorite Things Sweet Succulent stamps and dies to create this card. I colored the images with Copics and applied them with foam tape give them some dimension. The background is done on watercolor paper with Distress Inks using the "smooshing" technique.
I white heat embossed the sentiment on a black banner to make it pop. I think the sentiments from this set are really clever. 
I cut down the water color panel, mounted it to black card base and added two strips of card stock for a little added interest. 
Thanks for stopping by!